Integrating Mailchimp with EasySocial
We've been receiving quite a lot of request for EasySocial to be able to send out newsletters to the registered users. Well, here we are! In EasySocial 1.2.7, we've developed a custom field that allows your users to subscribe to your MailChimp list easily. The mailchimp custom field helps you to send out newsletters to the respected profile types. I know that we can use the Joomla!'s native mass messenging but it can only be sent out according to user groups. What happen if you want to send out two newsletters; one for the teachers in your domain while the other is for the students? This is where the app does it's magic.
The setting up requires you to have a Mailchimp account (duh!) and a set lists of users or more. Once you've logged in to your Mailchimp account, all you have to do is to obtain two information; your mailchimp's 'API key' and the 'list ID' of any lists that you wish to blast. Key in these two information in the app, activate the app in the respected Profile Type and it's all done. It's THAT simple, so simple that I'm going to give you guys free tutorials on how to enable it. Grab your cup of coffee and let's go!
Obtaining your MailChimp's API key.
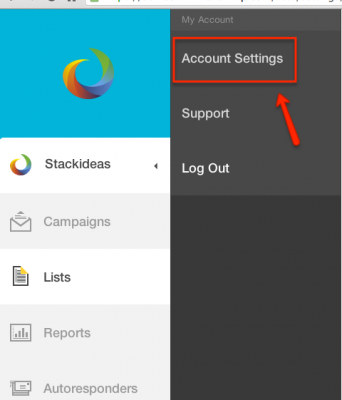
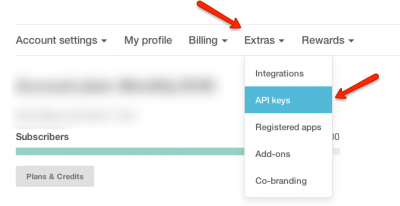
1. You can obtain the API key by logging in to your MailChimp account and navigate to Account > Extras > API Keys.
2. From there, click on the 'Extra' menu and then click on 'API Key'.
3. You will arrive in the API key page. Scroll down and click on the 'Create Key' button.
4. Mailchimp should create a key for you. Copy that key.
Should you face any issues, kindly refer to MailChimp's support for further assistance.
Obtaining your Lists ID
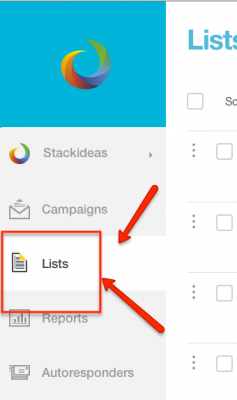
1. You can obtain this by logging in to your MailChimp's account and navigate to list.
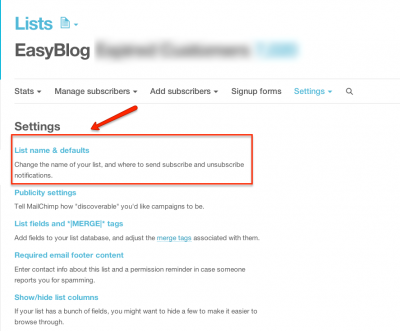
2. In your lists, click on the lists that you wish to use as your EasySocial's user lists and navigate to Stats > Settings.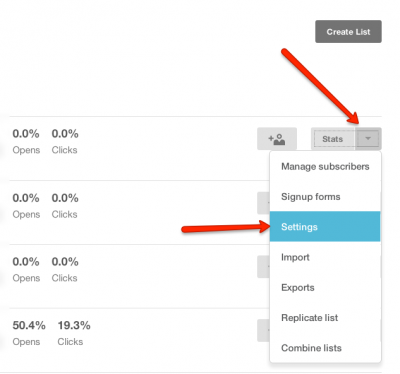
3. In the Setting page, click on "List name and default".
4. There should be a 'List ID' on the right side of the screen; we'll be using it in the next steps ahead so copy this and paste it in a place where you can retrieve it later. Kindly refer to MailChimp's support should you find that any of these informations are missing.
Putting those information in EasySocial
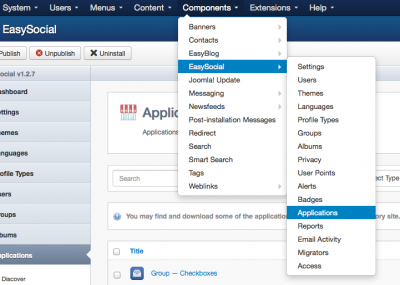
1. Login to your EasySocial's backend and navigate to EasySocial > Application.
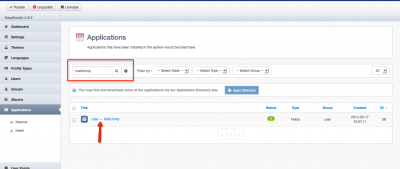
2. From the application menu, click on the 'MailChimp' menu. You can make use of the filter.
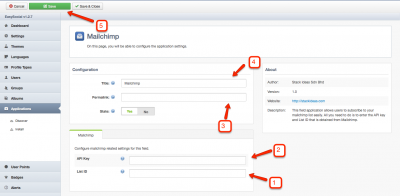
3. In the MailChimp menu, key in your MailChimp's API key and your List ID. You can change the 'Title' and 'Permalinks' according to your preferences. Once done, click 'Save'.
We're done with the app's setting! Let's enable this in your preferred Profile Type.
Applying to Profile Types
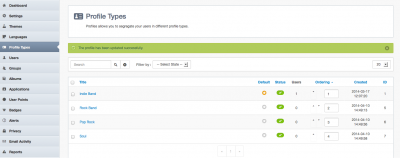
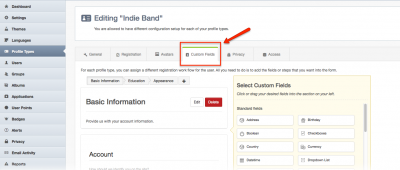
1. Click on the 'Profile Types' menu in your EasySocial's backend and you should be able to view the list of available Profile Types.
2. You can either create a new Profile Type OR choose an existing one. Navigate to the profile type's custom field.
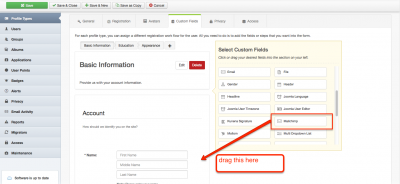
3. In the 'Select Custom Fields' box (in yellow), find 'Mailchimp', drag it to the left side of the menu and drop it where you want it to be. For instance, if you wish to put it in the 'Basic Information', drop it in it's box.
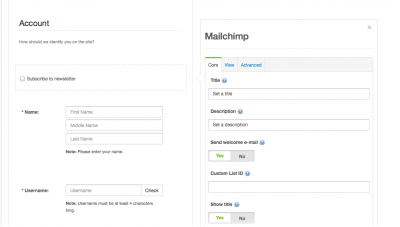
4. Click on the dropped Mailchimp field and you will be able to edit it's parameters.
5. Once you've set up it's title, description and such, click on the save button and your Mailchimp's field is all set up! Anyone who clicks on the checkbox will be receiving newsletters from it's campaign linked via the List ID. Yay! Give Mr MailChimp a high five!
The setup process is easier than you thought. It took me personally about 2 minutes to understand the whole process and mind you, I'm not as as technical as you guys. :)
Well, I hope this entry helps you guys to setup your Mailchimp's field accordingly. Should you have any inquiries, kindly drop us a ticket or start a new thread in our official EasySocial forum. For those of you who have no idea what EasySocial is OR is wondering how to obtain this awesome social networking component for Joomla, you can do so by clicking on the button below :
Feel free to leave your comments and thoughts. Happy Socializing! :)
