JD Simple Contact form extension is a simple form builder for a Joomla ideally suited for beginners and also meeting the basic requirements of every developer & designer. It allows creating various types of form like a mailing list, surveys, contact form and much more.
Its includes:
- Unlimited number of form fields.
- 10+ field types.
- Ability to make fields required with custom error messages.
- Ability to order fields.
- Ability to configure Thank you message.
- Ability to redirect to another page after form submission.
- Custom email messages.
- Ability to CC, BCC messages & Reply-to messages.
- Ajax Submission.
- Include the IP info with the email template. (Latest)
- Supports both reCAPTCHA and Invisible reCAPTCHA (Latest)
Steps to Install JD Simple Contact Form
Follow these simple steps to install the module on your Joomla:
- Download the JD Simple Contact Form zip file either from our Official website or via Github.
- After downloading Go to Extensions > Manage > Install, choose the Upload Package file tab and drop your downloaded file here.
- Now access the JD Simple Contact Form in the module section.
Setup & Configure of the Joomla Contact Form
Once you open up the contact form module you have 3 different tabs to work upon that are: Module, Form Layout & Email Options. Rest all the others tabs are same as in other modules of Joomla.
Module Tab
In the Module tab you can configure the basic settings of the form like Adding title, enable/disable the Captcha, customize the Thank you message after form submission and many other such options.
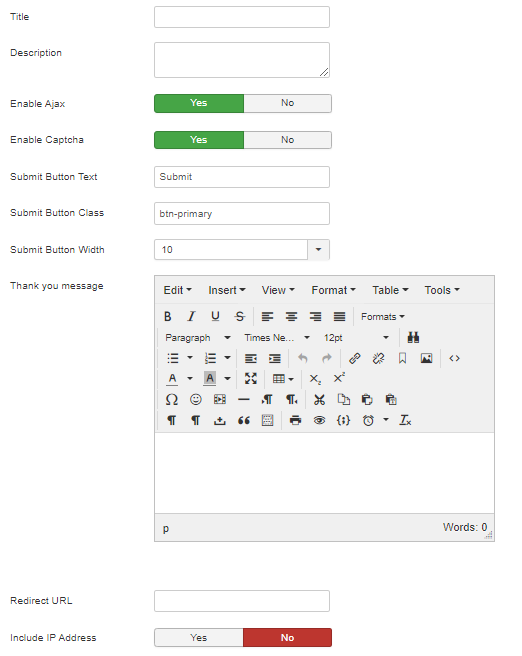
- Title: Add the title of your Joomla Contact form.
- Description: Add a small description to the form if you wish to, its optional. It will be displayed below the form Title.
- Enable Ajax: Choose whether you want Ajax form submission or not.
- Enable Captcha: Choose whether you want the captcha to be enabled or not.
- Submit Button Text: Customize the text of your form submission button.
- Submit Button Class: Manage the color of the button as per the template theme (btn-primary).
- Submit Button Width: Adjust the size of the submit button.
- Custom Thank You Message: Customize the thank you message after form submission.
- Redirect Url: Add a link to redirect users after form submission.
- Include IP Address: Choose whether you want to know the IP Address of your leads via Joomla Contact Form.
Note: The latest version now has 2 different types of captcha available that are reCaptcha & Invisible reCaptcha therefore make sure to select your default Captcha from Global Configuration > Site tab > Choose your default captcha value for it to be working on frontend!
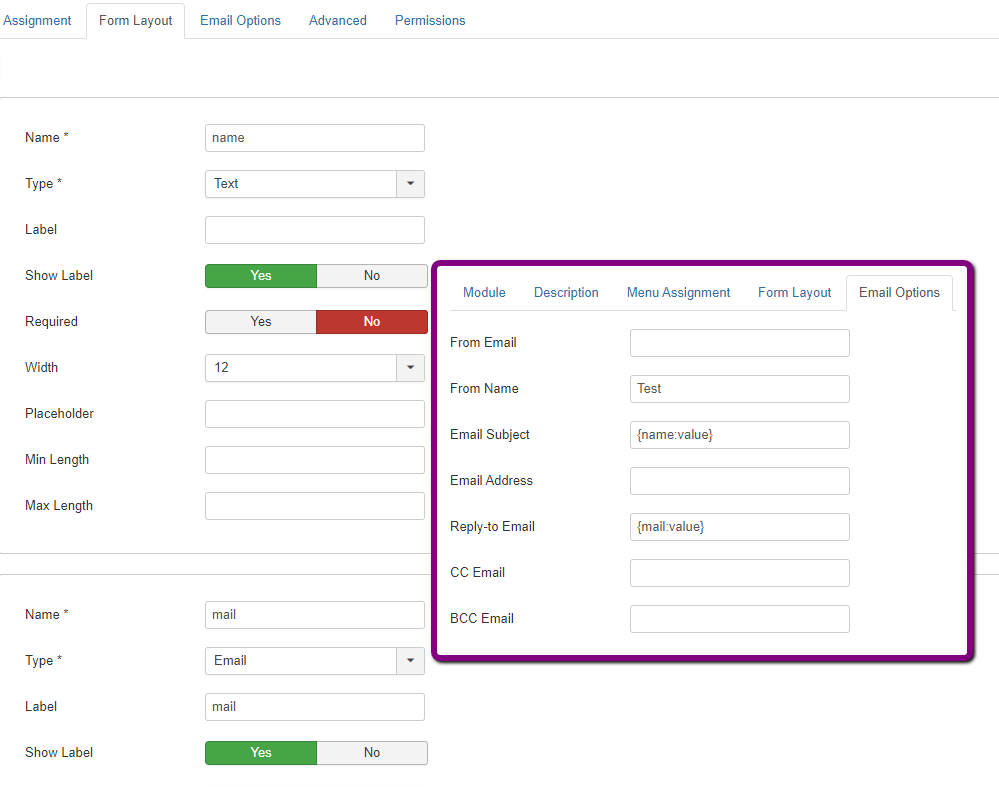
Form Layout
Under the Form Layout tab start designing your contact form by clicking on the plus button. We provide 10+ different form field types from Textarea to Calendar to File Upload field and many more like such.
The form layouts allow you to design forms and display it exactly in the layout, you can use drag and drop for ordering the fields, each field requires a Name, Label and a Field type.

- Name: The name of the form field needs to be unique for each form.
- Type: There are pre-defined field types that can be selected from dropdown options.
- Label: Add Title/Name of the field, the label will render in the frontend describing the respective field.
- Required: Select Yes to make the field mandatory then the user is complied to fill the field before form submission. If selected No the field is treated as optional.
- Width: Set the width of the field depending upon the number of columns chosen. By default the width is 12.
The different type available are as follows:
- Text: Single-line input that accepts any form of text.
- Textarea: Multiple line input that accepts any form of text.
- Radio: It’s allows users to choose only one of a predefined set of mutually exclusive options. Each option is separated by Enter key, style the radio buttons horizontally(Inline) or vertically(Vertical).
- Checkbox: It shows that a particular feature has been enabled or choose a particular option.
- Checkboxes: Enable multiple checkboxes, so a user can toggle through the response list. Each option is separated by Enter key and style the boxes either Inline or Vertical.
- Calendar: Use the calendar field to add dates in the form. You can also manage the format of the date entered to avoid absurd entries.
- List: Give a list of options, separated by Enter key where only one can be selected.
- Email: Its a single line input and accept only e-mail addresses.
- Number: Single line input and accepts only numeric values. Set the maximum & minimum value and length of the number that user can enter.
- URL: Single-line input that accepts links only.
- File Upload: This allows users to submit any media format through the form. Only the formats & sizes mentioned under Global configuration > Media of your Joomla will be accepted but the form.
- Hidden: Add a hidden value that can only be viewed via the form submission mail received.
Email Options
Under this tab you need to set the email configuration of the contact form like the Email Subject, from whom the email will be received, any CC or BCC recipient and many more options.
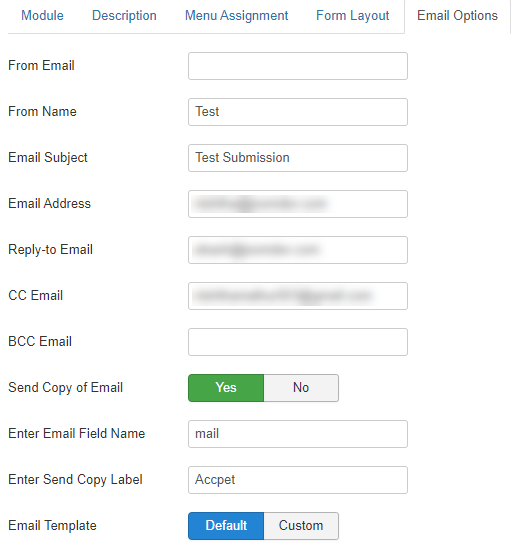
- From Email: Enter the email address from which the user will receive mails after form submission.
- From Name: Enter the name/title of the email sender.
- Email Subject: Give the email subject upon receiving the mail.
- Email Address: Enter the email address that will receive all the form submission emails.
- Reply-To-Email: Add the reply to email address if a user after form submission wishes to inquire something more.
- CC Email: Enter email address whom you want in the CC section of the email. Use a comma to separate multiple emails.
- BCC Email: Enter email address whom you want in the BCC section of the email. Use a comma to separate multiple emails.
- Send Copy Of Email: Add the option for the user to receive a copy of their submitted form after checking on the checkbox. If Enabled, then we have the following 2 options:-
- Enter Email Field Name: Enter the Name of the field below which the checkbox will be there.
- Enter Send Copy Label: Add a label to the checkbox.
- Email Templates: Choose you email template if selected Default then the default form submission mail is received, but if selected Custom then the customized email is received in the mail.
Note: In most of these options you can also use dynamic values where you need to mention their values using the following syntax:
{fieldname:value} where fieldname is the name of that field in the layout & value is the the value entered by the user.