
Customize SEF Links In Joomla!
What are SEF links?
Take a look at this link: http://www.example.com/Blog/Posts.php?Year=2006&Month=12&Day=19&title=helloworld
It can be written to: http://www.example.com/Blog/2006/12/19/helloworld
Now, doesn't SEF URL looked a lot nicer and much easier to remember?
If you would like to learn more about SEF links, you can easily Google search the keyword 'SEF url' or 'SEF link'.
Below are some good references to understand the concept of SEF links:
What are Search Engine Friendly URLs (SEF) and why are they important?
Search Engine Friendly URLs - Joomla! Documentation
Now, let's begin the tutorial on how to customize SEF links. I'll be using our component EasyBlog and a 3rd party component SH404EF as example throughout this tutorial.
You will also need a fair amount of PHP coding knowledge, as there will be quite a number of PHP code examples shown throughout this tutorial.
Oh, I'd assume you already know how to enable SEF in Joomla!. Otherwise, if you're new to Joomla!, welcome on board! Joomla is one of the greatest CMS platform out there.
1. Login to your Joomla back-end and go to the Global Configuration page and under the 'Site' tab.
2. You should see SEO Settings and select Yes to "Search Engine Friendly URLs" option.
SEF Setup for EasyBlog
Next, on my Joomla site frontend, my SEF link for EasyBlog's entry post page as shown below,
http://www.j38xtestbed.com/blog/payplans-4-0-beta-released
The above SEF link is pretty decent already. But, what if I want to add more items into the link? For an example, the post's author name (or alias).
Currently in EasyBlog, the only way to add the author's name alias part of the SEF link is to create child menu item into your EasyBlog's main menu item. But the process can be a total nightmare especially when your site has many authors.
Imagine your site has over 20 authors, and you'll have the trouble of creating 20 menu items. Not forgetting, whenever your site has a new author, you'll also have to constantly remember to create a menu item as well. I know that in itself doesn't sound fun. Hence, i'm here to show you how you could add author name alias into your EasyBlog post's SEF links :)
Basically, there are two ways to customize your EasyBlog's SEF links:
1. Considerably the more difficult method, it requires you have to fully understand how EasyBlog's router and parse method were written before you could even customize the SEF links. Let's not waste your precious weekends by trying to understand how EasyBlog's router was written.
We will go with the Second method,
2. Using SH404SEF component to customize your EasyBlog SEF links. You can learn more about this component at https://extensions.joomla.org/extension/sh404sef/
Customizing your EasyBlog's post SEF Links
Since today's tutorial focuses on customizing your EasyBlog's post urls, we will need to modify the 'entry.php'. Let's open up this file in your favorite editor and the image below shows the content of the entry.php file,
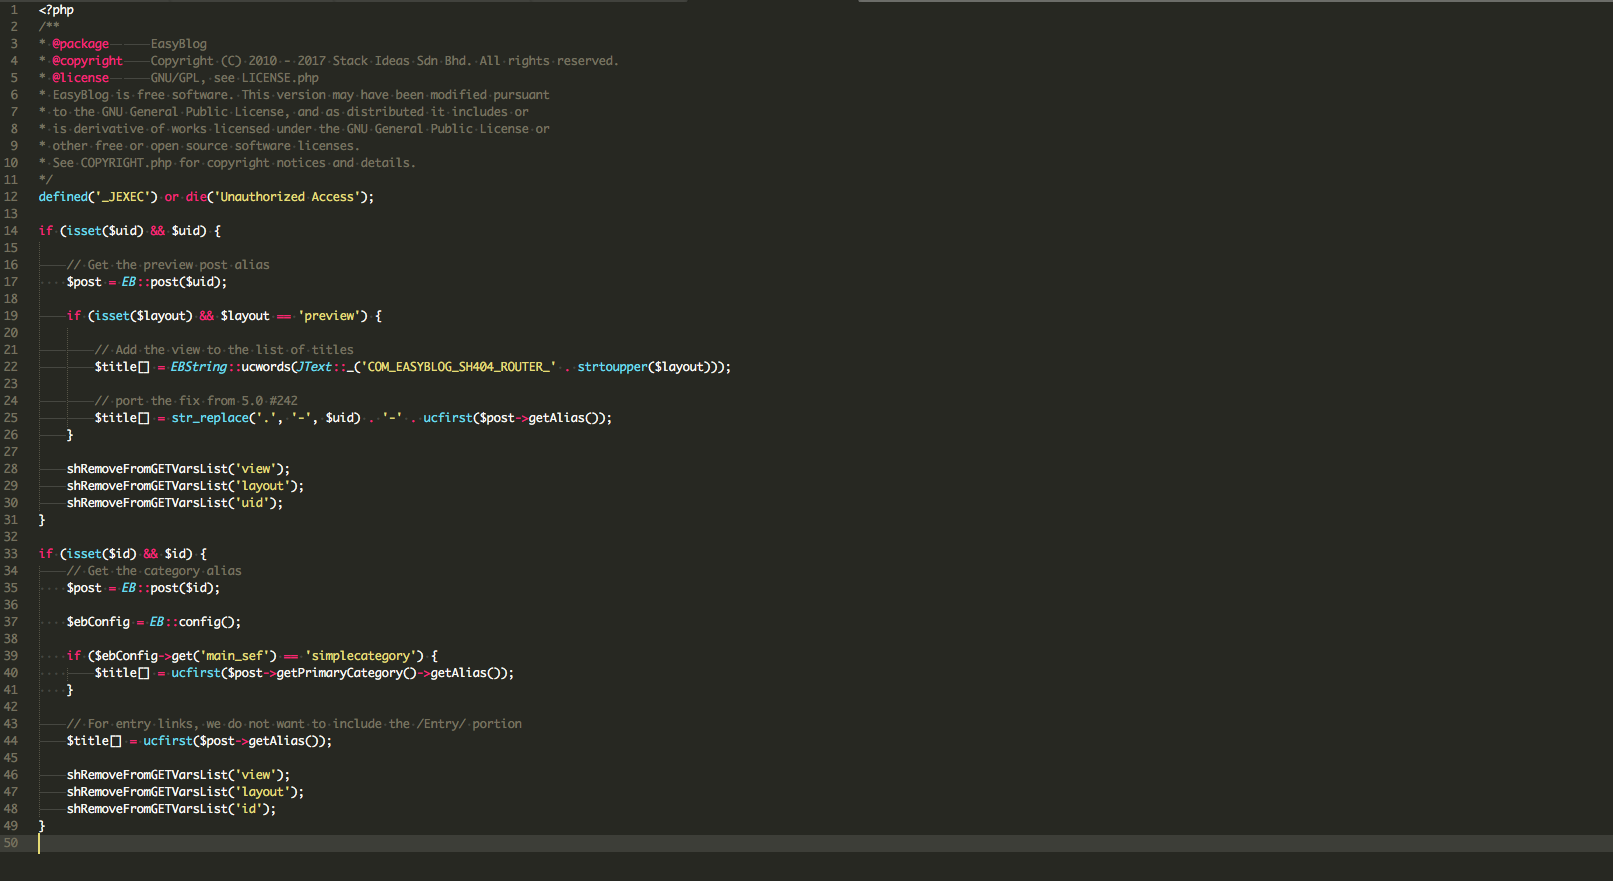
The only block of code that we're using for this tutorial is the IF block:
if (isset($id) && $id) {
	// Get the category alias
    $post = EB::post($id);

    $ebConfig = EB::config();

    if ($ebConfig->get('main_sef') == 'simplecategory') {
    	$title[] = ucfirst($post->getPrimaryCategory()->getAlias());
    }

	// For entry links, we do not want to include the /Entry/ portion
	$title[] = ucfirst($post->getAlias());

	shRemoveFromGETVarsList('view');
	shRemoveFromGETVarsList('layout');
	shRemoveFromGETVarsList('id');
}
The above code basically checks whether the non-sef link has the post ID. If Yes, the code will load the post and get the post's alias and add into $title variable. The sequence of adding value into $title variable is important. For example:
// if you do this:

$title[] = 'read';

// then:

$title[] = ucfirst($post->getAlias());
'/read/helloworld'
If you reverse the order of the above example to:
$title[] = ucfirst($post->getAlias());
$title[] = 'read';
The SEF link will now become 'helloworld/read'. So, keep this in mind. Next, let's go ahead and add the author's alias before the post title.
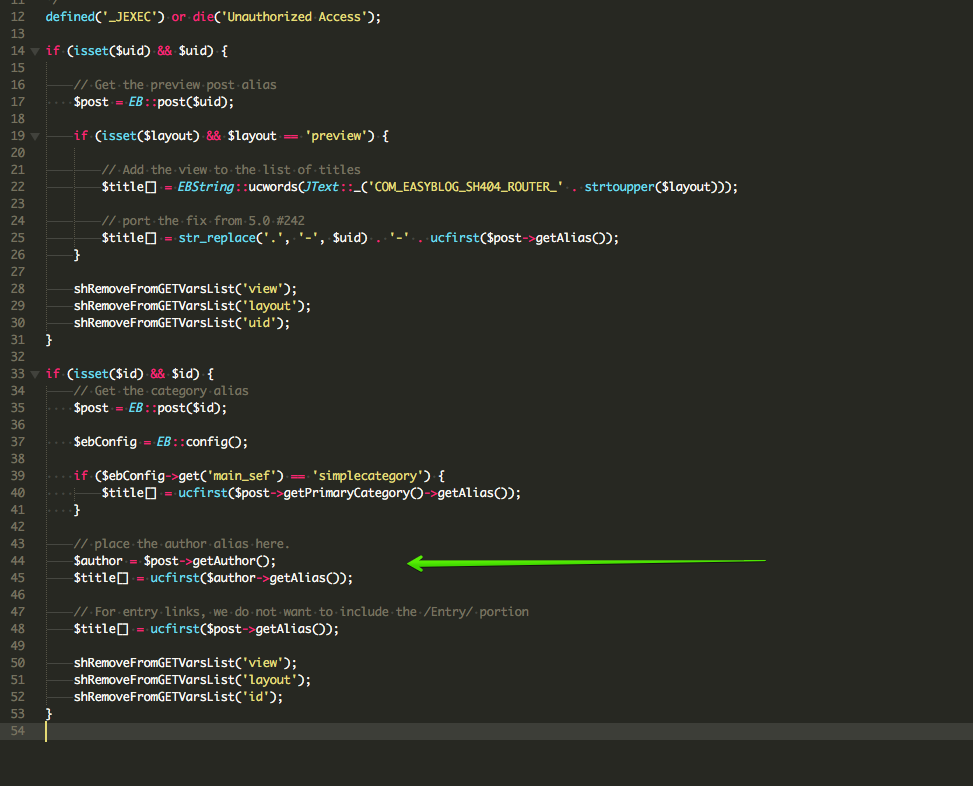
.
	.
	.

	// place the author alias here.
	$author = $post->getAuthor();
	$title[] = ucfirst($author->getAlias());

	// For entry links, we do not want to include the /Entry/ portion
	$title[] = ucfirst($post->getAlias());

	.
	.
	.
}
Once you added the above code, it should look something like the image below:
Awesome, you're almost done. Now, you will need to purge your SEF links from your SH404SEF, so the new changes will take immediate effect. Once that's being taken care of, your EasyBlog's post SEF should by now be added with the author's alias.
For example:
BEFORE: http://www.j38xtestbed.com/blog/payplans-4-0-beta-released
AFTER: http://www.j38xtestbed.com/blog/susan/payplans-4-0-beta-released
It's pretty simple right? All you have to do is some trial and error to get the best outcome for your SEF links. I hope you guys learnt something new from this tutorial, and we will see you on the next tutorial post. :)